This is the multi-page printable view of this section. Click here to print.
Getting Started
1 - Prerequisites
1.1 - Organization roles and responsabilities requirements
Learn more about Microsoft Dev Box Organizational roles and responsibilities for the deployment, access the official Learn more… site.
Overview
The Dev Box accelerator aligns with the requirements and responsibilities for each organizational role involved in deploying and using Microsoft Dev Box, with a focus on RBAC permissions and configuration prerequisites.
The roles covered include:
- Platform Engineers
- Development Team Leads
- Developers
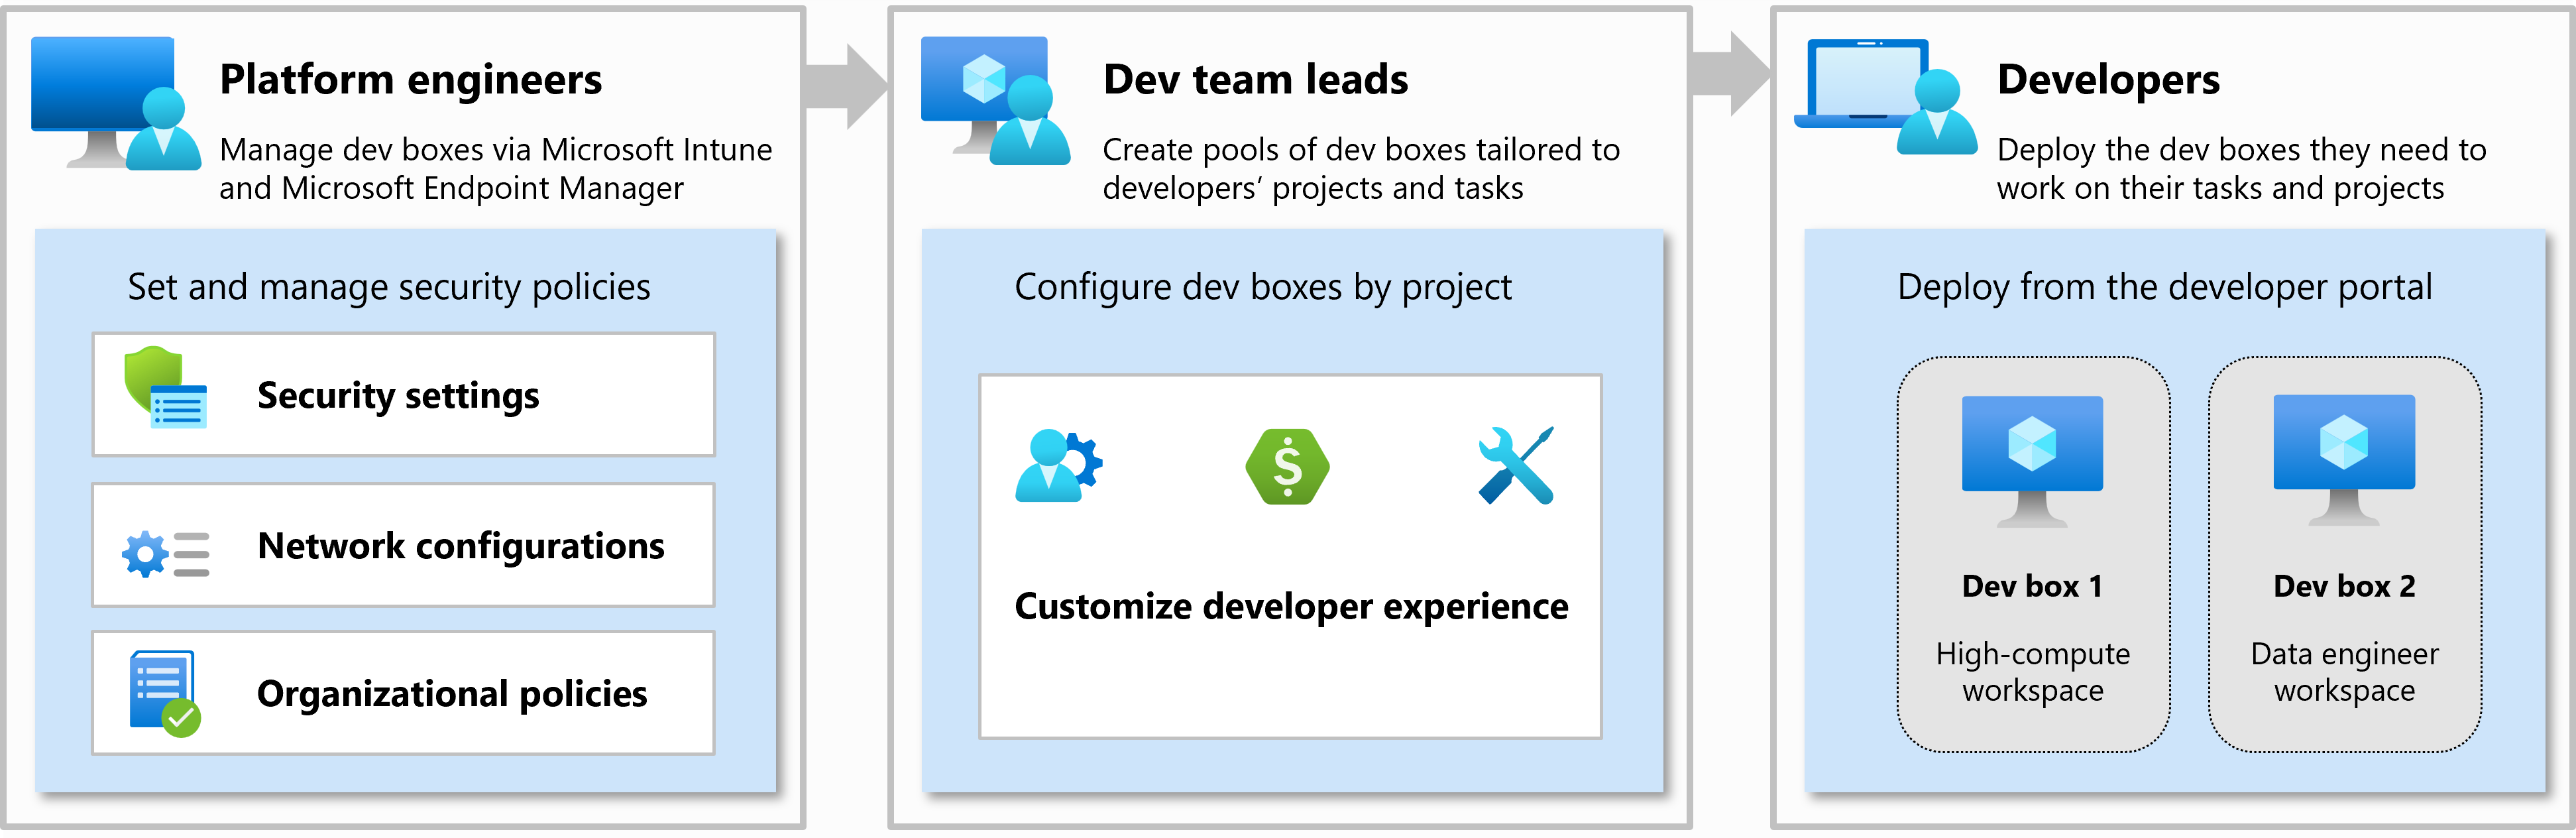
Each role has distinct requirements to ensure a secure, scalable, and successful Dev Box deployment.
Platform Engineer Requirements
Platform Engineers are responsible for deploying and governing the core infrastructure that powers Microsoft Dev Box, including Dev Centers, network connections, and governance policies.
Responsibilities
- Create and configure Dev Centers and Projects
- Set up network connections (Microsoft-hosted or custom VNETs)
- Define Dev Box definitions (SKUs, base images)
- Apply RBAC roles and enforce policies
- Enable monitoring and diagnostics
Required Azure Roles
| Role Name | Purpose | Learn more… |
|---|---|---|
| Owner / Contributor | Grants full control of resource deployment and access management | Owner Role |
| Managed Identity Contributor | Required to Create, Read, Update, and Delete User Assigned Identity | Managed Identity Contributor |
| Network Contributor | Required to manage virtual networks and DNS for custom connectivity | Network Contributor |
Additional Requirements
| Component | Description | Learn more… |
|---|---|---|
| Azure Subscription | Must have access to a valid Azure subscription | Manage subscriptions |
| Microsoft Entra ID | Configured for managing access and identity | What is Microsoft Entra ID? |
Development Team Lead Requirements
Development Team Leads manage the Dev Box experience for their teams by defining image configurations, Dev Box pools, and assigning users to environments.
Responsibilities
- Define Dev Box pools per team or project
- Customize and manage Dev Box definitions
- Assign users to Dev Box environments via Microsoft Entra ID groups
- Validate Dev Box readiness and configurations
Required Azure Roles
| Role Name | Purpose | Learn more… |
|---|---|---|
| DevCenter Project Admin | Allows creation and management of projects, Dev Box pools, and user assignments | DevCenter Project Admin Role |
| Contributor (Optional) | Required for managing custom images or shared galleries | Contributor Role |
Additional Requirements
| Component | Description | Learn more… |
|---|---|---|
| Azure Compute Gallery (Optional) | Required if using custom images across environments | Azure Compute Gallery |
| Azure Image Builder (Optional) | Used to automate creation of custom Dev Box images | Image Builder |
Developer Requirements
Developers are end users of Microsoft Dev Box and require access to preconfigured environments that match their team’s development stack.
Responsibilities
- Access and manage assigned Dev Boxes via the portal
- Use the Dev Box to develop, build, and test code
- Customize environment (if permitted) within constraints
Required Azure Roles
| Role Name | Purpose | Learn more… |
|---|---|---|
| Dev Box User | Grants the ability to view, start, and use Dev Boxes assigned through Dev Box pools | Dev Box User Role |
| Deployment Environments User | Grants the ability to view, start, and use Dev Boxes assigned through Dev Box pools | Deployment Environments User Role |
Summary
Before deploying or using the Dev Box accelerator, ensure each role has the following:
- Platform Engineers: Subscription access, network configuration, Dev Center ownership, and monitoring setup
- Team Leads: RBAC permissions, Dev Box definitions and pools, image strategy, and group assignments
- Developers: Assigned Entra ID group, portal access, and an understanding of the configured environment
For RBAC setup instructions, see:
Assign roles using Azure portal
1.2 - Framework and Tools requirements
Overview
This document provides a reference table for key Azure development tools, along with direct links to their official documentation and installation guides.
| Title | Description | Official Documentation Link | How to Install Link |
|---|---|---|---|
| Microsoft Azure CLI | Command-line tools for managing Azure resources | Azure CLI Documentation | How to install |
| Microsoft Azure Developer CLI | Command-line tools for developers working with Azure | Azure Dev CLI Documentation | How to install |
| Bicep | Domain-specific language for deploying Azure resources | Bicep Documentation | How to install |
| VS Code | Source-code editor developed by Microsoft | VS Code Docs | How to install |
How to Install
Windows (via PowerShell and winget)
# Azure CLI
winget install --id Microsoft.AzureCLI

# Azure Developer CLI
winget install --id Microsoft.AzureDeveloperCLI

# Bicep CLI (requires Azure CLI)
az bicep install

# Visual Studio Code
winget install --id Microsoft.VisualStudioCode
Ubuntu (via Bash)
# Azure CLI
curl -sL https://aka.ms/InstallAzureCLIDeb | sudo bash

# Azure Developer CLI
curl -fsSL https://aka.ms/install-azd.sh | bash

# Bicep CLI (requires Azure CLI)
az bicep install

# Visual Studio Code
sudo apt update
sudo apt install wget gpg -y
wget -qO- https://packages.microsoft.com/keys/microsoft.asc | gpg --dearmor > packages.microsoft.gpg
sudo install -o root -g root -m 644 packages.microsoft.gpg /etc/apt/keyrings/
sudo sh -c 'echo "deb [arch=amd64 signed-by=/etc/apt/keyrings/packages.microsoft.gpg] https://packages.microsoft.com/repos/code stable main" > /etc/apt/sources.list.d/vscode.list'
sudo apt update
sudo apt install code -y
2 - Quick Start
Before starting
- Prerequisites: Ensure you have installed all the prerequisites.
This guide will help you quickly deploy the Dev Box accelerator in your Azure environment for evaluation and testing purposes.
Installation
Step 1: Fork the Required GitHub Repositories
Begin by forking the necessary GitHub repositories to your account.
# Dev Box accelerator repository
gh repo fork Evilazaro/DevExp-DevBox --clone --remote

# Identity Provider solution demo repository
gh repo fork Evilazaro/IdentityProvider --clone --remote

# eShop solution demo repository
gh repo fork Evilazaro/eShop --clone --remote
Step 2: Initialize Your Local Environment
Navigate to your cloned Dev Box repository directory and initialize the environment:
Windows (PowerShell)
azd env new EnvName
Linux/macOS (Bash)
azd env new EnvName
Step 3: Deploy the Accelerator
Once your environment is configured, deploy the accelerator:
Windows (PowerShell)
azd provision -e EnvName
Linux/macOS (Bash)
azd provision -e EnvName
3 - Release Strategy
Overview
The Dev Box landing zone accelerator uses a branch-based semantic release strategy with intelligent overflow handling and conditional versioning rules. This approach ensures consistent, predictable releases while maintaining development flexibility across different branch types.
Build and Deploy Status
![]()
![]()
Releases
Learn more about the Dev Box accelerator landing zone releases.
Release Strategy Summary
| Branch Pattern | Version Strategy | Release Publication | Tag Creation | Artifacts |
|---|---|---|---|---|
main | Conditional major increment | ✅ Published | ✅ Created | ✅ Built & Uploaded |
feature/** | Patch increment with overflow | ❌ Not published | ✅ Created | ✅ Built & Uploaded |
fix/** | Minor increment with overflow | ❌ Not published | ✅ Created | ✅ Built & Uploaded |
pull_request | Based on source branch | ❌ Not published | ✅ Created | ✅ Built & Uploaded |
Branch-Specific Versioning Rules
🎯 Main Branch (main)
New Conditional Major Increment Rule:
- If
minor = 0ANDpatch = 0: Increment major version- Example:
v1.0.0→v2.0.0
- Example:
- If
minor ≠ 0ORpatch ≠ 0: Keep major version, increment patch- Example:
v1.5.0→v1.5.1 - Example:
v1.0.3→v1.0.4 - Example:
v1.5.3→v1.5.4
- Example:
Overflow Handling:
- If patch exceeds 99: Reset patch to 0, increment minor
- Example:
v1.5.99→v1.6.0
- Example:
- If minor exceeds 99: Reset minor to 0, increment major
- Example:
v1.99.99→v2.0.0
- Example:
✨ Feature Branches (feature/**)
Patch Increment Strategy:
- Increments the patch version by the number of commits in the branch
- Format:
vX.Y.(Z+commits)-feature.branch-name
Examples:
- Current:
v1.2.5, Branch:feature/user-authentication, Commits: 3 - Result:
v1.2.8-feature.user-authentication
Overflow Logic:
- If
patch + commits > 99: Reset patch to 0, increment minor - If minor overflow occurs: Reset minor to 0, increment major
🔧 Fix Branches (fix/**)
Minor Increment Strategy:
- Increments the minor version by the number of commits in the branch
- Format:
vX.(Y+commits).Z-fix.branch-name
Examples:
- Current:
v1.2.5, Branch:fix/login-bug, Commits: 2 - Result:
v1.4.5-fix.login-bug
Overflow Logic:
- If
minor + commits > 99: Reset minor to 0, increment major
Version Examples
Main Branch Scenarios
| Current Version | Condition | Action | Result | Reasoning |
|---|---|---|---|---|
v1.0.0 | minor=0, patch=0 | Major increment | v2.0.0 | Clean state allows major bump |
v1.5.0 | minor≠0, patch=0 | Patch increment | v1.5.1 | Development continues on current major |
v1.0.3 | minor=0, patch≠0 | Patch increment | v1.0.4 | Development continues on current major |
v1.5.99 | Patch overflow | Minor increment | v1.6.0 | Patch overflow triggers minor bump |
v1.99.99 | Cascading overflow | Major increment | v2.0.0 | Full overflow resets to new major |
Feature Branch Scenarios
| Current Version | Branch | Commits | Calculation | Result |
|---|---|---|---|---|
v1.2.5 | feature/auth | 3 | 5 + 3 = 8 | v1.2.8-feature.auth |
v1.2.97 | feature/ui | 5 | 97 + 5 = 102 > 99 | v1.3.0-feature.ui |
v1.99.95 | feature/api | 8 | Cascading overflow | v2.0.0-feature.api |
Fix Branch Scenarios
| Current Version | Branch | Commits | Calculation | Result |
|---|---|---|---|---|
v1.5.3 | fix/bug-123 | 2 | 5 + 2 = 7 | v1.7.3-fix.bug-123 |
v1.98.3 | fix/critical | 3 | 98 + 3 = 101 > 99 | v2.0.3-fix.critical |
Release Notes Structure
Each release includes comprehensive documentation:
🌟 **Branch-Based Release Strategy with Conditional Major Increment**

🔀 **Branch**: `main`
🏷️ **Version**: `v2.0.0`
📦 **Previous Version**: `v1.0.0`
🚀 **Release Type**: `main`
🤖 **Trigger**: `Push`
📝 **Commit**: `abc123...`

## Release Strategy Applied
🎯 **Main Branch**: Conditional major increment (only if minor=0 AND patch=0)

## Main Branch Logic
- **If minor=0 AND patch=0**: Increment major → `major+1.0.0`
- **If minor≠0 OR patch≠0**: Keep major, increment patch → `major.minor.(patch+1)`
- **Overflow handling**: If patch > 99 → `minor+1, patch=0`

## Artifacts
- 📄 Bicep templates compiled to ARM templates
- 🏗️ Infrastructure deployment files
- 📋 Release metadata and documentation
Best Practices
For Developers
Branch Naming: Use descriptive branch names following the patterns:
feature/descriptive-namefix/issue-description
Commit Strategy: Keep commits atomic and meaningful as they influence version calculations
Testing: Ensure all changes are tested before merging to main
For Release Management
- Main Branch Protection: Only merge tested, reviewed code to main
- Version Monitoring: Monitor version progression to prevent unexpected major increments
- Release Planning: Use the conditional major increment rule for planned major releases